MP3: Perception in VR
Due: Mar. 27, 2019, @ 11:59 PM
Provided Material:
Important Notes
- Read the submission instructions carefully! If you are missing some files, but we can still grade, you will lose 20% of the total points. If we cannot grade your work due to missing files, you will receive no credit.
- Save your project onto the
U:drive, which is your EWS storage, and available across all of the computers in the lab. If you save to theC:drive, your project will only exist on that single computer. - If you use your own machine, make sure you use the version of Unity installed on all of the lab machines to avoid compatibility issues.
- To enable autofill in Visual Studio 2019, go to
Edit->Preferences->External Toolsand change theExternal Tools Script EditorfromOpen File ExtensiontoVisual Studio 2019.
Table of Contents
Note for Changes due to no lab use:
MP3 will still be developed according to the assignment specification already on the website To test MP3, you will be using the OVRHeadsetEmulator. (Documentation found at https://developer.oculus.com/documentation/unity/unity-hmd-emulation/?locale=en_US)
Attach the script to the parent camera in your project. (It can be found in Oculus -> VR -> Scripts)
NOTE: You must use an OVRCameraRig or OVRPlayerController for best results. You will not need to add additional scripts for the emulator to work with these.
By using the controls outlined in the emulator spec, you will be able to test the behavior of your MP
Additionally, to facilitate grading, you will need to add keyboard keys as controls for any place you have OVRTouch Controller Buttons.
Intro
This assignment will demonstrate the difference between position and rotation tracking. It will also teach you to appreciate how much depth perception relies on both of these, and teach you how to enable and disable them. It’ll also help you understand the rigid body transformations covered in class.
Note, make sure to have Oculus Integration downloaded/imported on your project and ‘Virtual Reality Support’ enabled.
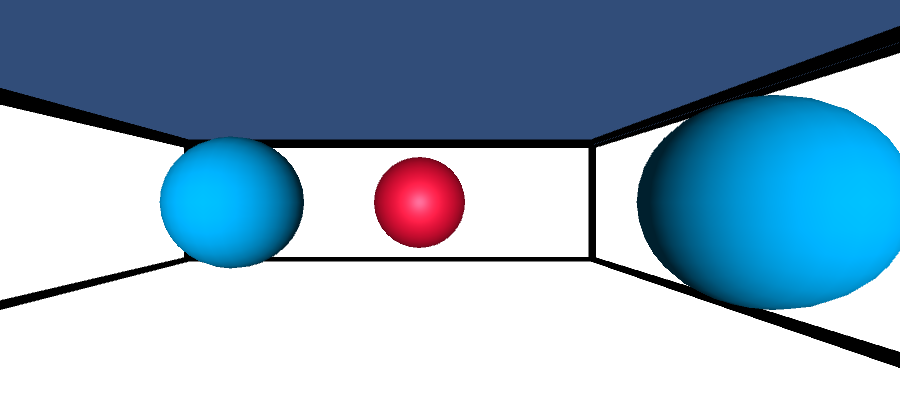
Depth Perception and Relative Size
In the provided scene, the StimulusManager object has three spherical children.
Put the red sphere at position ( 0, 0, -2.3) and the two blue spheres at positions (0.7, 0, -1.6), (-0.8, 0, -1), respectively.
Create a script called GenerateStimuli that dynamically changes the sizes of the two blue spheres so that
no matter what the position and orientation of the camera are,
the blue spheres always “appear” to be at the same depth as the red sphere with respect to their retinal image sizes (reference: sec. 6.1.1).
That is, we ask you to vary the sizes of the blue spheres
so that the rendered images of all of the three spheres have equal diameters when viewed on the Oculus Rift display.
| Before | After |
|---|---|
 |
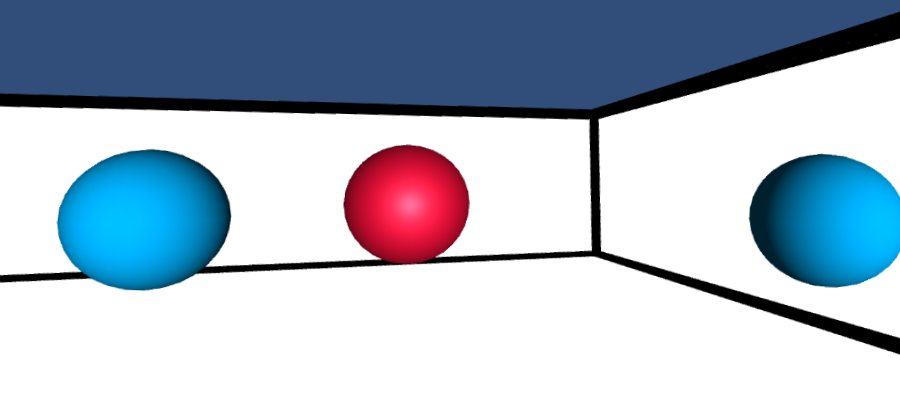 |
You are only allowed to change the sizes of the blue spheres to complete this task. You must not change the positions of the three spheres, nor the size of the red sphere.
You must add a control for a button that makes the spheres appear or disappear. The red sphere must [dis]appear immediately after the user presses the button, and the two blue spheres must [dis]appear exactly two seconds after the red sphere [dis]appears. You can assume that the user will not press the button again within the two seconds. The spheres should initially be invisible, and the GenerateStimuli script should permanently activate when the user presses the button for the first time.
Even after you complete this exercise, you will still easily infer the relative depth between the three spheres, because there are many depth cues other than retinal image size that help you perceive depth accurately. Therefore, this exercise will not create an illusion of the spheres being placed at equal distances from your eyes. You can check the editor screen though to make sure the depth cue changes were made. You will learn more about optical illusions and depth perception later in class.
Disabling Tracking
The Oculus software automatically sets the camera’s Transform based on the headset’s position and rotation tracking.
In this task, you must counteract that tracking, i.e. the net effect is as though tracking was disabled.
This should help you understand how much tracking contributes towards a feeling of presence in VR.
Create a script named ToggleTracking that turns tracking on and off.
You must add controls for two separate buttons to disable position and rotation tracking, independently of each other.
A bad solution is to put all GameObjects as children of the camera.
This depends on the hierarchy structure of Unity and causes performance issues, so we will not accept it.
We want you to think about how to counteract the effects of position and rotation tracking using transformations.
Please remember to tell us what your control scheme is.
Submission Instructions
Step 1: Create a Unity package file
- Save your Unity scene in the Assets folder with a descriptive title.
- Using the editor, find the created scene in the Project menu
- Right click on the scene and select “Export Package…”
- Export the file using default settings. Make sure that “Include dependencies” is enabled.
- This will create a
.unitypackagefile. We may use this during grading if your executable does not work, so make sure you also submit the data folder.
Step 2: Create a standalone build
- Save the project to
C:\Users\<your netid>\<project name>temporarily, rather than the EWSU:drive. Local storage is faster when building. - Go to Edit → Project Settings → Player. Make sure the “Virtual Reality Supported” box under XR Settings is checked.
- Go to File → Build Settings.
- Open the scene with your work for the MP.
- Click “Add Open Scenes”. You must have saved the scene to the assets folder for this to work.
- Click “Build”.
- This will create an executable (
.exe) for running the build, a folder containing your scene data, a “Mono” folder, andUnityPlayer.dll.
Step 3: Copy the Input Manager file
- Shut down your project.
- In your project folder, navigate to the
ProjectSettingssubfolder. - Find the
InputManager.assetfile, and copy it to your submission folder. This will allow us to replicate any new gamepad buttons or joysticks you mapped.
Step 4: Zip the files and submit through Compass
- Create a zip file containing the following items:
- The
.unitypackagecreated in Step 1 - The
.exe,.dll,Mono, AND DATA FOLDER created in Step 2 - The
InputManager.assetfile found in Step 3 - A
README.txtfile containing any instructions or notes relevant for evaluating your assignment.
- The
- Ensure that the executable in your submission folder runs correctly on the Rift before submitting. The easiest way to do this is to unpack the zip file into a new folder, and then run the executable.
- Name the file by separating NetIDs with underscores-
_cs498vr_MP#_part#.zip. EXAMPLE: Ifsteve1andanna2worked together, the file for MP 1.1 should be calledsteve1_anna2_cs498vr_MP1_1.zip. - Only one partner should submit the resulting file.
Rubric
| Name | Points | Description |
|---|---|---|
| Position Tracking | 15 | Toggling position tracking works correctly, and does not cause discontinuities. |
| Rotation Tracking | 25 | Toggling rotation tracking works correctly, regardless of where we are looking. |
| Simultaneous Rotation and Position Tracking | 25 | Toggling both rotation and position Simultaneously works correctly. |
| Depth Perception Trick | 20 | The spheres appear to be of equal size while the script is active, regardless of where the user is in the room. |
| Depth Perception Script | 15 | The spheres appear in the correct order, and the script works when run repeatedly. |
| Total | 100 |